Did you know? The HTVRONT Auto Heat Press is smart! It automatically adjusts pressure based on the thickness of your item, ensuring perfect results every time. No more guessing or manual adjustments!
The HTVRONT Auto Heat Press is a versatile tool that allows you to create custom designs on a variety of materials. It's perfect for creating unique gifts, personalising clothing, and adding a touch of flair to your belongings.
In this article, we'll walk you through the steps of using the HTVRONT Auto Heat Press, from unboxing and setup to troubleshooting common issues. For detailed product-specific instructions, you can always refer to the official HTVRONT user manuals.
Unboxing and Setup
Before you start using your HTVRONT Auto Heat Press, you'll need to unbox it and set it up. Here's what you'll need to do:
Unbox the heat press. Carefully remove the heat press from the box and inspect it for any damage.
Assemble the heat press. Follow the instructions in the user manual to assemble the heat press. This may include attaching the handle, connecting the power cord, and attaching the pressure plate.
Connect the heat press to a power source. Plug the power cord into the heat press and then into a power outlet.
Adjust the pressure. The HTVRONT Auto Heat Press has adjustable pressure. Follow the instructions in the user manual to set the pressure to the desired level.
Understanding the Control Panel
The control panel of the HTVRONT Auto Heat Press is simple to use. Here's a breakdown of the basic functions:
① Power key: Turns the machine on and off.
② Temp key: Sets the temperature and allows you to switch between Celsius and Fahrenheit.
③ Time key: Sets the pressing time.
④ "+" key: Increase the temperature or time value.
⑤ "-" key: Decrease the temperature or time value.
⑥ "R" key: Starts the pressing process.
⑦ "Mode" key: Selects pre-set settings for common materials: PU HTV (1), Glitter HTV (2), Transfer Paper (3), Sublimation Paper (4).
⑧ "Custom" key: Allows users to create and save two personalised temperature and time settings.
⑨ "Auto" key: Automatically iron on a batch of similar products based on the user-defined memory modes.
⑩ Display screen: Show temperature, time, mode level, and "Auto" mode indicator.
Preparing Your Design
Before you can transfer your design to your garment, you'll need to prepare it. Here's how:
Choose the right HTV material.Heat Transfer Vinyl (HTV) is a special type of vinyl that is used to create designs on fabric. Choose an HTV material that is compatible with your project. If you're new to HTV, check out our comprehensive Heat Transfer Vinyl 101 guide to understand the different types and their applications.
Cut your design. Cut your design out of the HTV material.
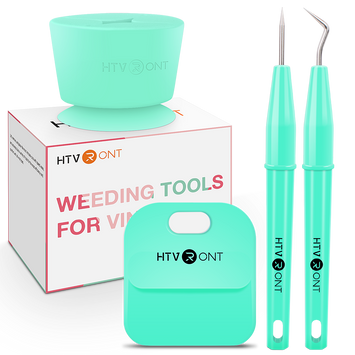
Weed the excess HTV. Remove the excess HTV from your design using weeding tools, leaving only the parts you want to transfer.
Apply transfer tape. Apply a sheet of transfer tape to your design to hold it in place.
For projects requiring full-colour or photographic designs, you might explore heat transfer paper or printable vinyl as alternatives to traditional HTV.
Transferring Your Design
Now that your design is ready, you can transfer it to your garment. Here's how:
1. Prepping the garment. Make sure the garment is clean and ironed.
2. Press the switch key to start heating. The start key will feature a long green light. And beeps when reaching the set temperature.
3. Preparing press mat. Pull out the heat plate, and we can see the heat press mat.
There are rubber bands for fixing it.
4. Placing the design. Position your design on the garment where you want it to be.
5. Place the cloth and material. Push them to the heat-pressing area.
6. Closing and locking the heat press. Close the heat press and lock it in place.
7. Starting the heat press cycle. Press the start button to begin the heat press cycle.
8. Removing the transfer tape. Once the cycle is complete, carefully remove the transfer tape to reveal your design.
Now it's done. Let's take a look.
Get Started with the Fast Ironing
The auto heat press has 4 fast modes, each for different products.
Mode 1: PU HTV
The heating temperature is 300°F, and it will take 15s.
Press "start" to begin heat pressing without setting the temperature time again.
Mode 2: Glitter HTV
The heating temperature is 320°F, and it will take 15s.
It's suitable for various materials, such as textiles, wood, and ceramic.
Mode 3: Transfer Paper
The heating temperature is 330°F, and it will take 20s.
To improve operational safety, the placement area is separated from the heating area.
Mode 4: Sublimation Paper
The heating temperature is 390°F, and it will take 40s.
Fast heating time makes the products stand out in the market.
Quick Reference Settings Chart
Use this comprehensive reference chart to quickly find the optimal temperature, time, and pressure settings for different HTV materials and transfer papers.
For best results, always refer to this chart when starting a new project. The settings below are optimised for the HTVRONT Auto Heat Press and have been tested across a wide range of materials. For manual heat press users, we also offer a range of manual heat press machines that provide excellent control for your projects.
Material
Fabric Compatibility
Temperature
Time
Pressure
Peel Method
Heat Transfer Vinyl
100% Cotton, Polyester, etc.
293°F / 145°C
15s
Heavy
Cold Peel
Glitter HTV
100% Cotton, Polyester, etc.
302°F / 150°C
15s
Heavy
Cold Peel
Holographic HTV
100% Cotton, Polyester, etc.
302°F / 150°C
15s
Heavy
Cold Peel
Chameleon HTV
100% Cotton, Polyester, etc.
293°F / 145°C
15s
Heavy
Cold Peel
Soft Metallic HTV
100% Cotton, Polyester, etc.
284°F / 140°C
15s
Heavy
Cold Peel
Printable HTV
100% Cotton, Polyester, etc.
293°F / 145°C
15s
Heavy
Cold Peel
Reflective HTV
100% Cotton, Polyester, etc.
302°F / 150°C
15s
Heavy
Cold Peel
Flocked HTV
100% Cotton, Polyester, etc.
302°F / 150°C
15s
Heavy
Cold Peel
Puff HTV
100% Cotton, Polyester, etc.
311°F / 155°C
15s
Heavy
Cold Peel
Heat Transfer Paper (Dark)
100% Cotton
320°F / 160°C
20s
Heavy
Cold Peel
Heat Transfer Paper (Light)
100% Cotton
320°F / 160°C
20s
Heavy
Cold Peel
Sublimation Paper
Polyester, Cotton ≤ 30%
392°F / 200°C
20s
Heavy
Cold Peel
Pro Tip: For the best results, always perform a test press on a scrap piece of material before starting your final project. This allows you to verify the settings and make any necessary adjustments. For a more comprehensive guide, visit our Heat Press Settings guide for detailed temperature, time, and pressure recommendations across all materials.
During the pressing process, it's essential to use a Teflon sheet to protect both your design and the heat press platen. A Teflon sheet acts as a heat insulator that limits the heat transferred from your press to your materials, preventing scorching and ensuring even heat distribution.
Memory Modes in Everyday Tasks
This auto heat press has two user-defined memory modes, which can set temp and time as needed and memorise the usage habit.
One-click Operation with the Auto Mode
Last, the auto mode is quite convenient and intelligent. It combines the features of fast ironing and user-defined models, which makes it easy to create a batch of similar products.
Troubleshooting Common Issues
If you're experiencing any problems with your HTVRONT Auto Heat Press, here are some common issues and how to fix them:
Wrinkled or cracked designs. This can be caused by using too high of a temperature or pressure, or by not letting the design cool down completely before removing the transfer tape.
HTV not adhering properly. This can be caused by using the wrong type of HTV, not applying enough pressure, or not heating the garment long enough.
Heat press malfunctions. If your heat press is not working properly, check the power cord, reset the machine, or consult the official user manual for troubleshooting guidance.
Tips for Success
Here are some tips for using your HTVRONT Auto Heat Press like a pro:
Practice makes perfect. The more you use your machine, the better you'll become at it.
Experiment with different materials. HTV can be used on a variety of materials, so don't be afraid to experiment.
Clean your heat press regularly. This will help to prevent build-up and ensure that your designs transfer properly.
Store your heat press in a cool, dry place. This will help to protect your heat press from damage.


 Black Friday Gift